I remember standing on a site in ’94, watching a young lad with a clipboard obsessing over a test cone while the driver was secretly dousing the mix with a hose just to make it easier to spread. He thought he was doing his job because he knew exactly how slump and consistence are measured on paper, but he was missing the real story. You can follow the textbook to the letter, but if you aren’t watching the way the aggregate settles or smelling when the mix has been thinned out too much, you’re just recording a lie. A number on a sheet doesn’t tell you if that slab is going to crack in six months when the sun hits it.
I’m not here to give you a lecture from a dusty manual or some expensive, over-engineered theory that doesn’t work when the rain starts coming down. I’m going to tell you how it actually works when the mud is flying and the clock is ticking. We’ll look at the real way to check your mix, why the standard tests often miss the mark, and how to spot a bad batch before it’s too late to send the truck back.
Table of Contents
The Astm C143 Slump Test Procedure Is Not a Suggestion
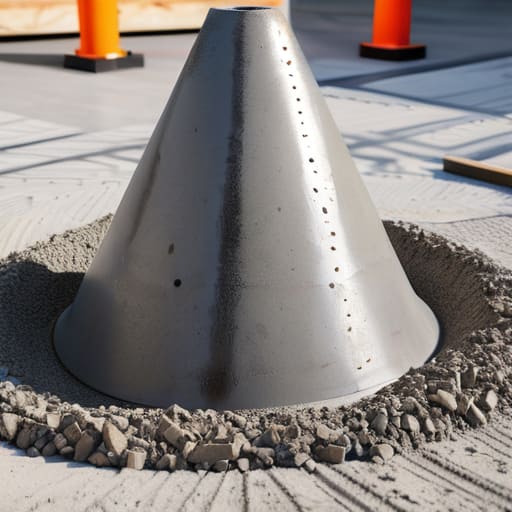
I’ve seen enough lads treat the ASTM C143 slump test procedure like it’s some bit of optional paperwork you do when the site foreman isn’t looking. They treat the cone like a suggestion rather than a rule. If you’re just shoving the rod in and hoping for the best, you aren’t testing anything; you’re just playing games with the numbers. You need the proper standard cone slump test equipment, clean and damp, and you need to use it with a bit of respect.
The problem isn’t the test itself; it’s the laziness behind it. I’ve stood on sites where the lad performing the test was in such a rush to get the truck moving that he didn’t even rod the layers properly. When you don’t compact those layers correctly, you get an air pocket that ruins your reading. A bad test gives you a false sense of security, and that’s exactly how you end up with a slab that looks fine on Tuesday but starts cracking by Friday because the mix was far too wet. If you don’t follow the sequence, you’re just wasting everyone’s time.
Why Standard Cone Slump Test Equipment Fails the Unprepared
Look, you can buy the shiny new standard cone slump test equipment from any supplier, but a piece of metal doesn’t make you a tradesman. I’ve seen lads on site treat the cone like a prop rather than a tool. They’ll set it on a patch of soft, uneven dirt or a piece of timber that’s wobbling in the wind, and then they wonder why their readings are all over the shop. If that base isn’t dead level and rock-solid, your measurement is a lie before you’ve even lifted the cone.
It’s not just about the gear, though; it’s about how you handle it. If you’re rushing the rodding—not quite getting those layers compacted or hitting the sides too hard—you aren’t measuring concrete plasticity, you’re just playing a guessing game. Most of the time, when I see a failed pour, it started with someone treating the ASTM C143 slump test procedure like a nuisance rather than a rule. They want the numbers to look good on the paperwork, but they aren’t actually looking at what the mix is telling them.
Five Ways You're Likely Messing Up Your Slump Readings
- Stop treating the cone like a magic wand. If you don’t rod the layers in exactly the same way every single time, your numbers are just guesswork. You lift that cone too fast or too slow, and you’ve already lied to yourself about what’s in the mix.
- Check your base plate for grit and moisture. I’ve seen lads try to run a test on a pile of loose dirt or a dusty, uneven slab. If that cone isn’t sitting on a flat, clean, non-absorbent surface, the concrete is going to bleed out sideways, and you’ll be staring at a slump reading that’s nothing but a fantasy.
- Watch the clock from the second the truck’s chute opens. You can run the most perfect ASTM test in the world, but if that mix has been sitting in the drum for forty-five minutes in the midday sun, the slump is going to drop before you even get the rod out. You’re measuring the age of the load, not the design of the mix.
- Don’t trust the driver when he says “it’s just a splash of water.” If you’re measuring consistency to see if it meets the spec, you need to account for what’s already been added. A slump test tells you what the concrete is doing now, but it doesn’t tell you if the driver has already ruined the water-cement ratio just to make the pour go faster.
- Learn the difference between a slump and a mess. A slump test measures how much the mix settles, but it won’t tell you if your aggregate is segregated. If you’ve got a lot of paste at the top and stones sinking to the bottom, your slump might look perfect on paper, but you’ve got a weak slab waiting to happen.
The Reality Check
At the end of the day, you can follow the ASTM C143 procedure to the letter and have the cleanest, most expensive cone in the county, but it won’t save a bad pour. Measuring slump is about more than just watching how much a pile of wet stone settles; it’s about catching the deception before it sets in stone. If you aren’t watching the consistency from the moment the chute opens, you’re just filling out paperwork for a failure that’s already happened. Remember, a number on a test sheet doesn’t mean a thing if the crew is secretly watering down the mix just to make the screeding a bit less of a headache.
I’ve spent forty-three years watching men try to cheat the physics of concrete, and I’ve seen the cracks they leave behind. You don’t do the slump test because the inspector is watching; you do it because you’re the one who has to stand behind the work when the ground settles or the frost hits. Take pride in the unseen details—the testing, the checking, and the stubborn refusal to accept a mix that isn’t right. If you get the consistency right the first time, you won’t be spending your retirement explaining to a homeowner why their driveway looks like a dried-up riverbed. Do it right, or don’t do it at all.
Frequently Asked Questions
If the slump test comes back too low, can I just add a bit of water to the truck to get the crew moving, or am I asking for a crack in six months?
You add water, you’re signing your own death warrant. I’ve seen it a thousand times: a crew is behind schedule, the mix looks stiff, and someone thinks a splash of water will “loosen it up” to make the screeding easier. You might get a smooth finish for twenty minutes, but you’ve just killed your water-to-cement ratio. You’re trading strength for convenience, and you’ll be back here in six months staring at shrinkage cracks and dusting. Don’t do it.
How do I know if the slump is actually changing because of the mix, or if the lads are just messing with the consistency while it's sitting in the hopper?
You watch the delivery ticket against what’s actually coming out of the chute. If the ticket says a 50mm slump and you’re looking at a puddle that’s spreading like spilled milk, someone’s been playing chemist with a hose. Don’t just trust the driver’s word; check the aggregate distribution. If the stones are all sinking and you’ve got a soup of paste on top, they’ve watered it down to make it flow.
What’s the difference between a test that says the concrete is "correct" and a mix that actually behaves right when I’m trying to screed it out?
Look, a slump test tells you how much the pile drops; it doesn’t tell you how the mix fights you. You can have a perfect test result on paper, but if that mix is “harsh”—meaning the stones are all separating from the paste—you’ll be fighting it every inch of the way with your screed. A test measures volume, but a good pour is about workability. If it doesn’t flow where you want it, the paper doesn’t matter.